


REQUIRE A BESPOKE LOOK?
We offer a custom design
service at NO extra cost.
When installing a frame for a sliding door wardrobe it is likely that existing skirting boards and/or ceiling coving may need to have sections removed to enable the frame to be fixed flush with the walls. In this article we discuss various methods for removing a section of skirting board and/or ceiling coving to enable the elements of the framing to be installed securely and to achieve the most professional finish.
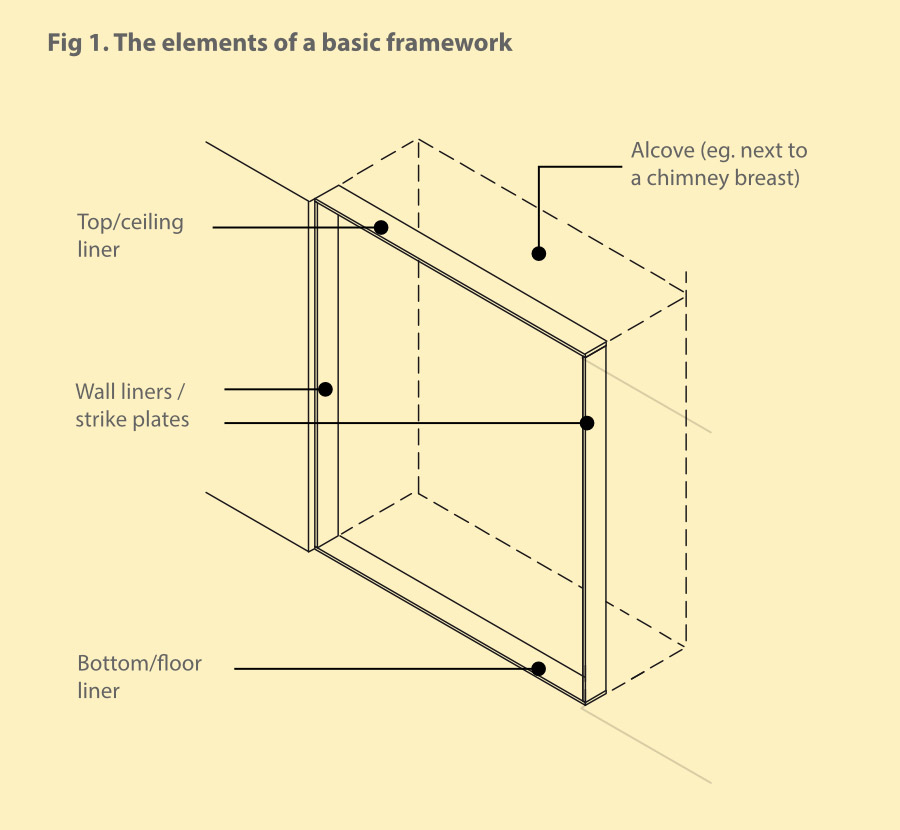
Prior to installing a set of sliding wardrobe doors it is important to create a frame that is true, plumb and square – see Fig 1. If you are starting from scratch you may find it helpful to read our article How to create a frame for sliding wardrobe doors using our 18mm thick MFC strike plates and liners to construct a frame. The installation of a frame will most likely require the removal of small sections of skirting board without removing from the wall and possibly coving / cornices.
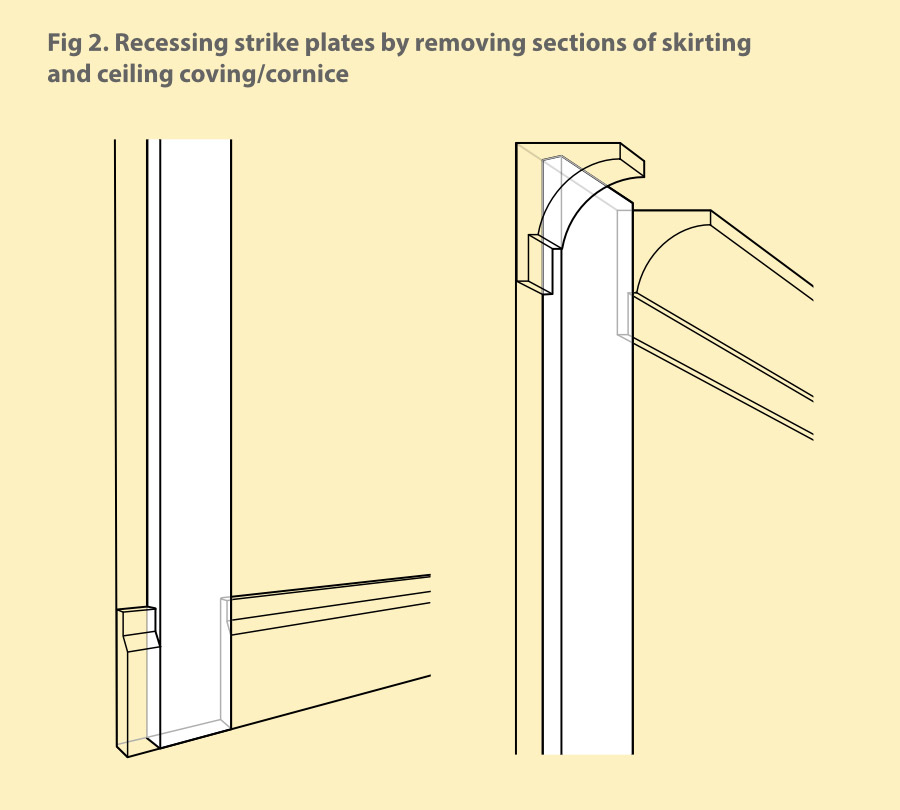
As this method enables the vertical elements of the frame to be recessed within rebates that have been cut out from the in-situ skirting board it offers the most professional-looking installation for your frame – see Fig 2. The steps described below will work for skirting boards made from either softwood or particle board (MDF).
First, mark with a pen or pencil on the skirting board the section you need to remove and then, using a spirit level to ensure both lines are exactly vertical, either scribe with a Stanley knife or mark with a pen or pencil, two vertical lines to mark the edges of the section to be removed.
Depending upon the situation, the cutting out of the section of skirting board with out removing from the wall may be achieved by various different cutting tools (see Fig 3):
- Removing skirting board with a tenon saw / pull saw / Japanese saw
A tool that most DIYers will have. Using a tenon saw, slowly pull the saw blade in a backwards direction along the scribed or marked line a number of times until a definite groove has been created. Then, begin to move the saw blade in a forward motion too to begin to achieve a deeper cut. Repeat on the other side of the section to be cut out. It is likely that you wont be able to extend the cuts right down to the floor as the end of the saw itself will prevent this but when you have cut a significant way through the skirting it should be possible to lever the almost-cut section away from the wall from behind, enabling you to saw through the remaining depth.
- Removing skirting board with a multitool / oscillating saw
A tool that most DIYers may not own but most professional joiners will have one. Although relatively cheap models are now available, it is a tool that once you have, you will wonder how you managed without it. Multitools make the cutting out of sections in skirting boards and indeed any other hard-to-reach or confined spaces an absolute breeze. Simply place the blade adjacent to the scribed or marked line and activate it to cut cleanly into the skirting board.
- Removing skirting board with a Dremel tool
Similar to the multitool in that it is a really useful tool for cutting in awkward or tight spaces. Instead of an oscillating blade, the Dremel has a rotary action blade. A Dremel is probably slightly underpowered for this job but with a little patience it is possible to use it to remove a section of skirting board. There may be slightly more remedial work required than with a multitool as the cut line using a Dremel will not be as neat.
- Removing skirting board with a drill and wood chisel
Neatly drill a number of holes down the inside of your scribed or marked line using a wood drill bit. The closer you manage to get these together, the easier the removal of the skirting board section will be. Once you have created a line of holes use a tenon saw or wood chisel to cut through the remaining material between the holes. When the majority of material has been removed a wood chisel can be used to neaten the cut edges of remaining skirting board.
When the two cuts have been made through the entire section of skirting board it should be a relatively simple matter to pull or lever it out, away from the wall, using either a large flat-bladed screwdriver, the blade of an old wood chisel or the curved end of a claw hammer. It is advisable to use a flat section of wood (eg. a plywood off-cut) to prevent the wall from being damaged.
You may find that the section of skirting you have chosen to remove is also fastened to the wall by a long nail banged into a wedge-shaped timber ‘noggin’ set within the underlying brickwork or stonework, or by a recessed screw. This is more likely to be the case in older houses as this was the usual method of fixing skirting boards back to the walls in the past. Therefore, the use of a junior hacksaw, or even just a hacksaw blade, may be necessary to saw through the metal fixing, as it is preferable not to have to risk pulling out the nail or screw in case damage to the underlying wall is caused. If the house is more recent in construction then the skirting board will likely be nailed and/ or glued in place and potentially caulked along the top edge to hide any gaps.
After the vertical members of the frame have been fitted and attached to the wall (see our article How to install sliding wardrobe doors when your walls are not plumb and straight) a certain amount filling may be necessary to achieve a smart finish. If this is the case, we suggest that the frame edges are protected with masking tape and any gaps between the skirting, wall or cornice are filled using an appropriate filler, following the manufacturer’s instructions.
The above techniques can also be used to remove sections of picture rails, dado rails and wall panelling.
If the wardrobe is to be a full-height, floor-to-ceiling installation the frame may also need to be recessed within a section of ceiling coving. As ceiling coving generally protrudes some distance from the wall and on to the ceiling surface it is not really feasible to butt the frames up to it or create infill panels as can be done with skirting board, and so a section of coving will need to be removed to accommodate the width of the frame. The techniques for removing sections of ceiling coving are largely the same as those discussed above for the removal of the skirting board.
The majority of ceiling coving or cornice is usually fabricated from plaster, polystyrene, polyurethane or a duropolymer and therefore can be initially scribed using a Stanley-type blade to cut deep grooves into the moulding to mark the section to be removed. After this, some of the tools discussed above can then be employed to remove the remainder of material, back to the wall and ceiling surfaces. In the case of moulded plaster cornice (found mainly in older houses), a sharp chisel and mallet can be used with care to remove the bulk of the unwanted material. Often, for reasons of weight reduction, more modern mouldings may not be completely solid (see photo opposite), and so when a portion is removed, hollow sections on either side may be visible. These may require making up with a product such a Polyfiller or even coving adhesive to fill the gap.
Always wear protective goggles or spectacles and a suitable face mask when removing plaster as a significant amount of fine dust can be generated during removal of older plaster coving.
As with most DIY jobs there are a number of different tools that can be used to achieve a similar outcome. In the above examples there may be a different amount of remedial/finishing/filling work required, depending on the method used. It is not always the case that the most expensive tools are necessary to complete a job but they may take less time to achieve the desired finish and/or limit the amount cleaning-up, filling and finishing required.
If you would like to discuss any of the above methods or add some of your own please speak to our technical team on 0800 035 1730.


We offer a custom design
service at NO extra cost.
Follow these simple guidelines to
get the perfect fit for your sliding
wardrobe doors.
The sliding wardrobe doors are
very easy to install so you don’t
have to be a DIY expert.
Request FREE samples to help
with the design process and
colour matching.