REQUIRE A BESPOKE LOOK?
We offer a custom design
service at NO extra cost.
Designing effective loft wardrobe storage means working with sloped ceilings, reduced height, and often deeper-than-expected spaces. While loft areas can feel restrictive, they often offer valuable depth—ideal for practical storage when used correctly.
Made-to-measure sliding wardrobe doors allow you to create clean, accessible storage across under-eaves areas without requiring door clearance. With the right installation approach and a well-planned internal layout, you can transform awkward loft spaces into highly functional, built-in storage.
Before choosing your layout, it’s important to understand how loft wardrobes differ from standard installations.
Loft wardrobe storage focuses on making use of lower ceiling areas—typically beneath the eaves—where standard furniture won’t fit.
Sliding wardrobe doors allow you to create:
In loft spaces, depth often matters more than height—use it to your advantage.
Because of these constraints, the simplest approach is usually the most effective.
Most loft wardrobe installations use a straight, horizontal opening. However, in some cases, angled sliding wardrobe doors may be required.
If your project needs doors that follow the ceiling slope, see: angled sliding wardrobe doors for sloped ceilings.
A square opening is typically easier to install, more cost-effective, and delivers a cleaner, more consistent finish.
The top track must always be installed level, running horizontally across the opening.
The system is bottom rolling, meaning the weight of the doors is carried on the floor. The top track acts as a guide only, but still requires secure fixing for stability and alignment.
In loft spaces, this means creating a solid, level fixing point beneath the sloping ceiling.
Angled ceiling brackets allow you to create a horizontal fixing point beneath a sloping ceiling.
They:
Best used when:
Consideration:
Installation guidance:
The top track is not load bearing, but it still needs a secure fixing point—always fix into joists or suitable structural supports.
While brackets suit tighter spaces, most installations benefit from a more structured approach.
This is the most common and practical method.
You create:
How It Works
The header panel fills the wedge-shaped void between the wardrobe opening and the underside of the slope, allowing a standard sliding wardrobe system to sit neatly below.
An 87mm strike plate/liner is commonly used for a clean, consistent finish.
The finish above the doors has a big impact on the overall look—take time to get this detail right.
If you’re converting your loft, this is the ideal stage to integrate wardrobe storage into the structure.
You can:
This approach:
Planning wardrobes during construction will always produce a better result than adapting the space afterwards.
A well-designed exterior is only part of the solution—internal layout is just as important.
Loft wardrobes typically:
This means the front is fully usable, while the rear becomes progressively more restricted.
For hanging clothes:
However:
Check usable hanging height across the depth—not just at the front.
Design the layout around the ceiling shape rather than forcing full-depth use.
Under-eaves wardrobes are ideal for:
These spaces are perfect for items you don’t need to access every day.
Always use the smallest measurement to ensure a proper fit.
Made-to-measure sliding wardrobe doors simplify loft installations by fitting your exact opening.
Typically at least 1000mm, depending on clothing type and layout.
Yes, but not always for hanging. The rear is usually better suited to shelving or storage.
An L-shaped header panel is generally the simplest and most versatile solution.
Yes. With accurate measuring and preparation, sliding wardrobe doors are straightforward to install.
Loft spaces may be awkward, but they offer excellent storage potential when approached correctly. By keeping the installation level, using a simple framework, and designing practical internals, loft wardrobe storage can transform under-eaves areas into highly usable space.
The key is not just fitting doors—but making sure the storage behind them works just as well.
Design your made-to-measure sliding wardrobe doors today or speak to our team for expert advice.
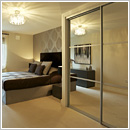
Seeing finishes in your own space makes it easier to choose. You can:
Our guides are written by the Wardrobe Doors Direct design and technical team, specialists in made-to-measure sliding wardrobe doors across the UK.
Call our team on 0800 035 1730.
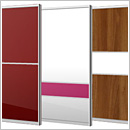
 Loft Sliding Wardrobe Doors – Como Full-length Panel Design")

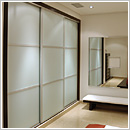
 Loft Sliding Wardrobe Doors – Como Design")


We offer a custom design
service at NO extra cost.
Follow these simple guidelines to
get the perfect fit for your sliding
wardrobe doors.
The sliding wardrobe doors are
very easy to install so you don’t
have to be a DIY expert.
Request FREE samples to help
with the design process and
colour matching.